1 Installing R
To learn how to use R, you obviously need to have access to it. This chapter, and the next one, guide you through the installation process of R and RStudio so that you can have both programs up and running in your computer.
If you already have R and RStudio installed in your machine, you can safely go to chapter First Contact with R.
1.1 Interacting with R
Before I show you how to install R and the integrated development environment RStudio, let me tell you first about the different ways in which users can work with R.
Overall, you can work with R in two major ways:
Interactive Mode, and
Non-interactive Mode
Interactive Mode. Most R users work with R in an interactive way, and this is certainly the way I personally interact with R in my daily coding activities. Interactive means that you launch R (i.e. you open a session), having direct access to its console. This is where you type in commands, and then R does its magic reading the commands, parsing them, evaluating them, and—typically—printing an output back into the console, waiting for you to type in the next command(s).
Non-interactive Mode. In contrast to interactive mode, working with R in
non-interactive way involves writing all the commands in a text file (for
example in an R script file), and then asking your computer—via the
command line interface—to pass this file to R so that it runs the
commands without you launching R or having direct access to its console.
Think of interactive way as having a direct conversation with R, establishing a dialogue in which you type in a command, R interprets it, gives you an answer, and then you type more commands, continuing the dialogue. In contrast, non-interactive is like writing a letter (or an email) to R. Here you don’t have that synchronous conversation, instead R will see the script file, try to execute all the commands “behind the scenes”, and it will disappear when it finishes the computations. You may get some output back, but R is gone in the sense that there is no open session waiting for you to execute the next instructions.
Most of what I discuss in this book is applicable to writing code in R regardless of how you decide to interact with R. However, to learn R and to follow the examples of the book it is definitely much better to do it in an interactive way using: a) R’s built-in graphical user interface (R’s GUI), b) an integrated development environment (IDE) such as RStudio, or c) R from a command line interface (CLI) commonly referred to as a terminal.
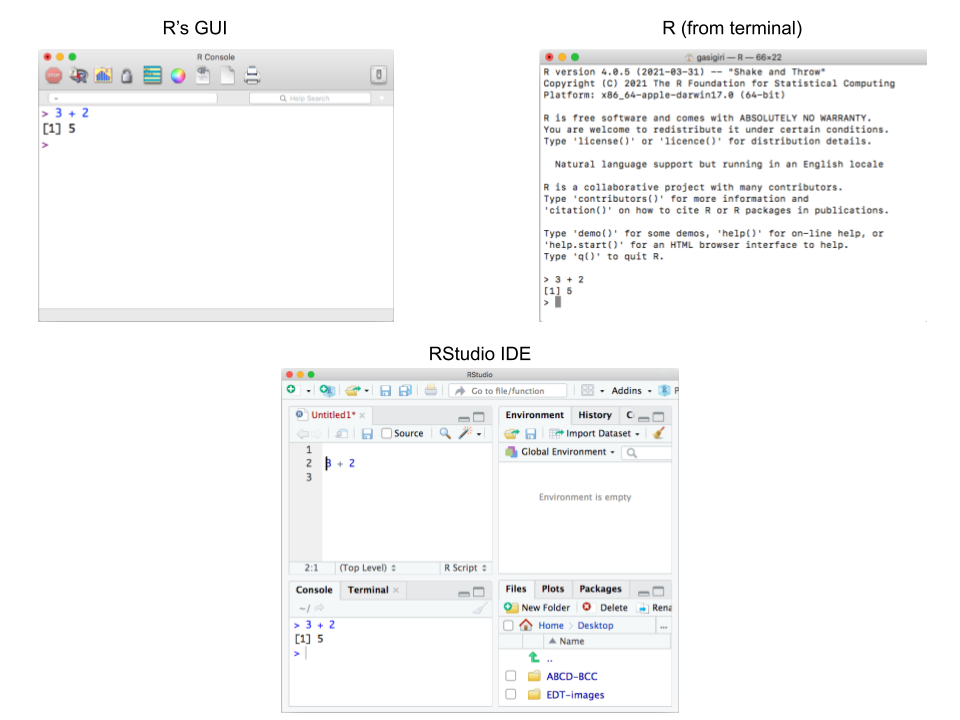
Figure 1.1: Interacting with R in various ways: R’s GUI, RStudio, and R from a command-line terminal
While you can interact with R using its built-in graphical user interface (GUI) or launching R from the terminal (command line interface), nowadays I highly recommend that you interact with it using an Integrated Development Environment (IDE) such as RStudio. Simply put, programs like RStudio provide a nice working space that make your life easier while writing code, creating all sorts of reports, documents, and slides, running analysis, making graphs, generating outputs, creating web apps, etc.

Figure 1.2: Main computational tools: R and RStudio
Keep in mind that R and RStudio are not the same thing. R is like the main
“engine” or computational core. RStudio is just a convenient layer that
talks directly to R, and gives us a convenient working space to organize our
files, to type in code, to run commands, visualize plots, interact with our
filesystem, etc. Having said that, everything that happens in RStudio, can
be done in R alone. Yes, you may need to write more code and work in a more
rudimentary way, but nothing should stop your work in R if one day RStudio
disappears from the face of the earth.
By the way, both R and RStudio are free, and available for Mac (OS X), Windows, and Linux (e.g. Ubuntu, Fedora, Debian). More about this in the following sections.
1.2 Installing R
To download and install R in your computer, follow the steps listed below.
Step 1) Go to the R project website: https://r-project.org

Figure 1.3: R project’s home webpage
Step 2) Click on the CRAN link, located in the navigation bar (on the left side). This will take you to the Comprehensive R Archive Network page (see screenshot below).
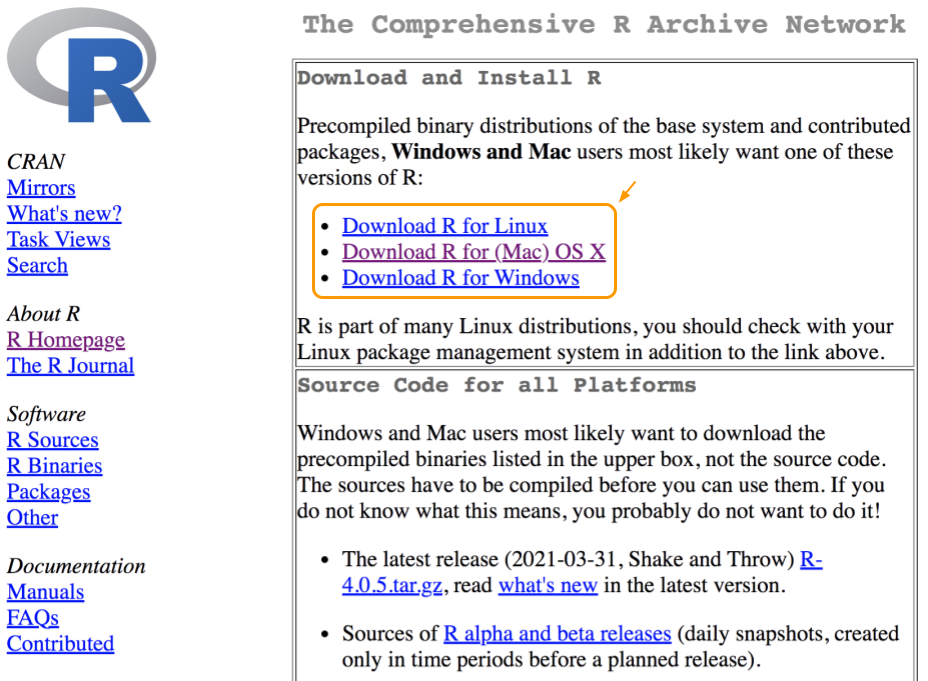
Figure 1.4: R is available for MacOS, Windows, and Linux
Step 3) Click on the download option that corresponds to your operating system (e.g. Linux, Mac, or Windows). In my case, I have a Mac computer, which explains why the Mac OS-X link is highlighted in the above screenshot.

Figure 1.5: CRAN download for Mac
For most users, you will want to install the Latest release, which in the screenshot above happens to be R 4.0.5 "Shake and Throw". Keep in mind that
by the time you read this book, R will very likely have a more recent version.
Step 4) Click on the package link, which in the screenshot corresponds to
R-4.0.5.pkg. This is the link of a compressed file that contains the binary
code. Before installing a given version of R, read the
description of the release to make sure the operating system in your computer
is compatible with a specific version of R.
After clicking on the R-4.0.5.pkg link, the compressed file will be
downloaded to your computer.
Step 5. Click on the downloaded file. An installation wizard will open automatically, ready to guide you through the installation process, step by step (see image below).
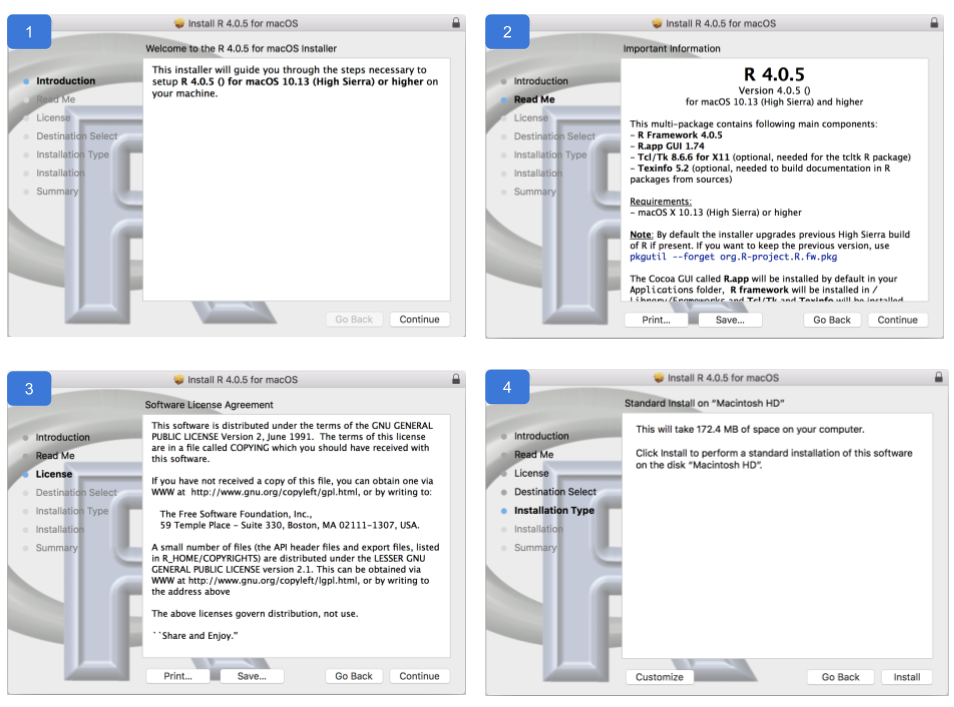
Figure 1.6: R Installation wizard for Mac
In most cases, you will want to use the default settings. Personally, I’ve been using the default settings for several years without having the need to customize anything.
At the end of the installation, if everything went well, you should be able to see a successful message (see figure below):

Figure 1.7: R Installation wizard for Mac